Monday 16 April 2018

The Evil Scarecrow Hallows Costume Part4

This is the final post on this costume make. I'm showing you how I created an additional accessory that all evil scarecrows need....a rather nasty looking scythe!...plus the final put together of all the elements....

and the big reveal at the Halloween party!

The previous year I had hunted down props in the local Wilkos Halloween stock sell off...and found plastic knives and swords in a variety of shapes, from curved hand scythes to axes...all for 10p each!...yup, that's right 10p each...silly silly price! So, you guessed it, I filled the basket and took all the remaining stock! The cashiers face was quite the picture, especially as the basket also contained their entire remaining stock of plastic spiders, worms and creepy cobweb fabric too...but at those prices can you blame me. I spent about £3 in total and got dozens of  useful pieces. They all go into the stash supplies box for future use....but one piece in particular was to be used for the scarecrow costume.
This is a Grim Reaper scythe...the handle was much longer on purchase, but made up of three sections that could be unscrewed apart...so I removed two lengths to make it more 'hand scythe' sized.
It's pretty naff and plastic looking...durh yeah...it is made of plastic and meant as a childs halloween prop so they obviously can't go selling realistic looking knives. But hey, that's ok because the bones of the piece were there and it just needed sprucing up a bit.
First I set about making the blade look a bit more metal like. I covered it using adhesive backed aluminium tape. This is one of my all time favourite, and much used, materials in my altered art work...you can cover practically anything that it will stick to and get a real metal surface which then takes inks, paints, rusting and distressing treatments really well.
I also added some smaller strips to the top of the handle....all added detailing!
Short lengths of twine were stuck to the top using strong carpet double sided tape, the raw cut edges set in place with wet glue then covered with a length of twine wrapped around the base of the blade.


The rest of the handle was completely wrapped in one length of twine...again using double sided tape to hold it in place.
It was then ready to age and distress. Waterbased inks and paints will not stick readily to the metal tape surface so I opted for Stazon...a solvent based ink that I use in my crafts and cardmaking.
Black ink aged and dulled the metal, Brown added a subtle rust effect, Red was used to make it look bloodied...although it did come out a bit too pink and I went back in at a later date and daubed on thick darker red acrylic paint (which started flaking off so I need to rethink what to use at a later date). For the party it held up long enough for the desired effect.

and so the costume was complete....and here is the reveal! On the night Clive applied black eyeshadow around his eyes and mouth so his own flesh tones didn't stick out too much under the mask.
Trial run of the costume...note: not wearing the gloves or has any straw hair.
The full costume worn at the party

Scarecrow Costume - Time spent over a period of 4 days, Cost approx £15. Suitable for Amateur with basic sewing skills but some artistic capability. Specialist tools/materials required Sewing machine, cotton thread and large sewing needle, plastic mask base, straw, hessian fabric, jute twine, acrylic paints, solvent based inks, strong double sided tape, adhesive backed metal tape, hot glue gun, pva glue, stanley 'type' knife and strong leather scissors, gloves, jumper, trousers, plastic rat and scythe props.

I hope you enjoyed reading about this make...as much as I enjoyed actually making it! Next post will cover the Evil Girl Clown costume you see me wearing in the photos above.

Tuesday 10 April 2018

The Evil Scarecrow Hallows Costume Part3

In this post I'm showing you how I made the mask and hood part of the Evil Scarecrow Halloween costume.

The piece was obviously going to be made out of hessian to match the rest of the outfit, and be inkeeping with the look of traditional scarecrows that tend to have hessian/jute sacking for their heads....and on researching for ideas I came across some fabulous scarecrow masks but I had a number of concerns.

Most masks made and for sale on the internet, were full head pieces and the mouths quite restrictive, some closed. Most were professionaly made and contained latex inner skins or other specialist materials. Firstly I was very much the amateur making this and didn't have access to a lot of their materials and tools to make in the same manner,  secondly we were drinking and eating at the Halloween party so I had to make the mask a bit more 'user friendly' for Clive so he could remove part or all of the mask without ruining the overall look of the costume...and also, importantly, he had concerns a full head piece and hat would be too hot to wear, so I had to design with comfort in mind too.

I decided on a three piece...the hat, with a hood (balaclava style with face section exposed) and a separate mask section that could be easily taken off (to eat and drink) and replaced quickly without disturbing the hood and hat...or the hood removed too so he could still wear the hat alone and still somewhat retain the look of the scarecrow.
To start.... I used a corner section cut from a large hessian bag/sack (you could sew two triangles of fabric) the open end rounded off and long enough so when worn over the head, it comes down and covers the shoulders.
The face hole was cut out and the raw edges turned in, and hemmed.
A noose was made from thick jute rope to tie around the neck and bring the hood tighter. That was pretty simple!
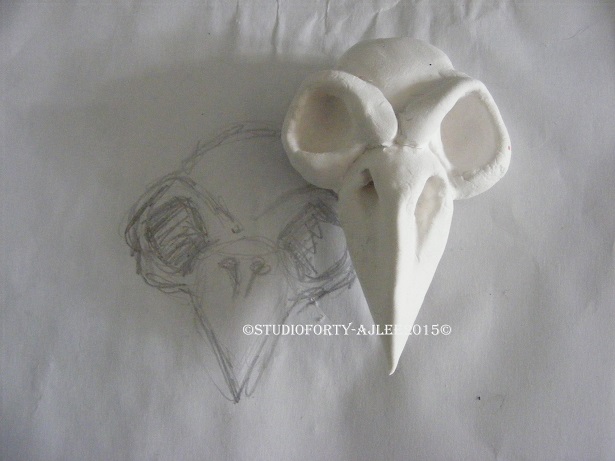
Now to the face mask part. A previous trip to the pound shop had resulted in a small purchase of useful halloween props (rats used for this costume...see previous posts) including this rigid plastic skull mask. Perfect to use as a base for my scarecrow mask!
I reshaped the skull, removing the nose and lower mouth part, turning it into a 3/4 mask and a base layer of hessian fabric was glued to the plastic. I used basic pva glue for this...it is a good adhesive to use with hessian, it soaks in, making the fabric pliable and easy to manipulate..and when it dries, makes it semi rigid so it holds more shape. I buy my pva glue in large container sizes from builders merchants/diy stores. I use a lot of it in my art and crafts so it's cheaper to buy this way, plus I personally think it's a slightly more concentrated version than a lot of craft pva glues...so a bit stronger.
The mask already had two holes in the sides, so I re threaded the elastic and tried it on the mannequin along with the hood, for size and best placement.
I then started building up the features of the scarecrow mask. I needed it more exaggerated because the layers of hessian I would be adding would cover and dilute what is already there on the preformed mask. Firstly making the brows more defined and heavier by rolling up remnants of hessian, binding with thread and gluing in place.
I started adding layers of fabric to the lower part of the face so I could start sculpting the nose, mouth and lower jaw.
I glued folded layers of the hessian to form the nose, mouth and lower jaw, but was careful not to apply too much glue...and only on specific areas in order to keep the fabric soft and pliable. I stitched any non glued areas in place with cotton and needle. I also built up a raised wavy scar like line on the head.
Once all the structure was complete I began applying the final top layer of hessian fabric.
An over sized piece of fabric was used so there would be excess to create drapes on the lower neck and creases and folds around the face.


I adhered the top layer to the eye and nose area, using pva glue, keeping the rest free and loose to manipulate and stitch in place.
Here you can see what it looks like from inside...and I started opening up the eye sockets...Clive need to be able to see...obviously!
Using matching coloured cotton, I formed folds and hand stitched the fabric, forming the nose...
then the mouth, and drapes around the face.
Once all the glue was dried and I was happy with the look of the mask, The hessian got the paint treatment...

....accentuating shadows with darker coloured acrylic paints, and highlights with lighter shades, dry brushing it on...going little at a time, building up the layers of paint.
The hessian pieces all got hung out to dry...on my washing line! My neighbours are used to seeing this sort of macabre stuff hanging out to dry...but workers repairing the nextdoors roof were a bit taken aback...then highly amused at the sight. Beats seeing boring undies and clothing drying.... lol 😉
With the paint dry I started adding large stitch work using jute garden twine and a sturdy upholsterers needle. I wanted it to look very obvious...and like crude repair work. Despite the glued sections, there was still enough give in the material to get a needle through it.
Finishing touches added...some straw hair and additional stitchwork to the hat brim...and we are all done!

One more post to go.....an additional accessory....and the big reveal for the Hallows Party!

Tuesday 3 April 2018

The Evil Scarecrow Hallows costume Part2

So, the Evil Scarecrow clothes were covered in the last blog post...it's now time to start looking at the scarecrow costume accessories....this post will be about the gloves and hat.

Clives hands needed to be disguised and covered up...so I took an old pair of gardening/builders gloves and used them as a base. These are actually real suede and fabric heavy duty gloves, already replaced with new ones and the intentions were to recycle the suede finger tips - cutting them off and using them as finger protectors in my jewellery business work. So that is what I have done...and the rest of the gloves got used for this costume!
The finger tips got snipped off (some heavy duty scissors required to cut through the fabric layers and leather).
A wash of diluted dark brown acrylic paint turns them a uniform one colour...and makes them look patchy and dirty and old....well, they were already old...I'm just making them look even older!

Strips of hessian fabric were glued around the hand parts and around each finger and thumbs.

more paint added to make the hessian dirty...and we have one pair of scarecrow gloves...done!

Now for the hat!

This was done 'on the wing'....ie freestyle with just an idea in the head what I wanted it to look like, and no set pattern to go by other than a rough measurement of circumference of Clives head. I sewed the majority of it on my sewing machine...must admit it played along nicely and stitched the hessian like a dream...I wasn't expecting that, but am grateful it did, as this halved the time it would have taken to hand sew!
First I cut out two ovals of hessian fabric, one I kept whole, the other I cut a centre circular section out of the middle (slightly smaller than the head circumference measurement.
Layering the pieces up I stitched them together all around the edge, but leaving and inch or so margin.

I snipped triangles out of the margin/hem, all around the piece.....

...you'll see why, next...
...and then, using the middle cut out bit, turned the whole thing inside out (it's actually now right side out...if you get what I mean!)...so we have a neat turned in hem edge.

Those little triangle excess bit we snipped off? well this prevents too much excess material bunching up inside the brim and keeps it nice and flat.
I then returned to the sewing machine and stitched again around the edge, just a centimeter in from the edge to create a channel. (This is for wire to be threaded in which will strengthen the brim and stop it becoming too floppy). I ironed the fabric to make it flatter and easier to work with too.
The next photo (above) doesn't fully show it...but I then cut out a matching centre hole out of the full side...so the whole thing now looks like a doughnut...so the hat can now properly fit over the head. Why didn't I do this at the very beginning?...well it just created less raw edges to fray in the initial sewing stages...so less mess.
The crown of the hat was next....a bit of rough estimating on the size was done...
...and four tall triangles of hessian fabric were cut. I had to calculate the base width of the triangle, taking into account seam allowance for each piece, x four to be just a fraction larger than the head circumference measurement. Better to err on the large size than to make a hat too small that will not only look to comical and silly, but be uncomfortable to wear.
The triangles were all stitched together along the longest sides only...to form a cone shape.
The cone was turned right side out...so the raw seam edges are on the inside......
....this was then pinned in place onto the brim...and sewn in place, with the seam inside.

Although not done at the time of wearing, I went on to cover the inside seam edge with a strip of cotton fabric. The raw hessian edge is very scratchy and itchy against the head...poor Clive bore it out for the night in question, but it was uncomfortable so I later went back and tidied up the seams.
Armature/garden wire (quite a thick strong one) was then threaded into the channel of the brim. The edges bound together and tucked in neatly so no sharp edges exposed.
I sat for a while fiddling around, shaping the brim...it started to look a bit like the Hogwarts Sorting Hat (Harry Potter)...I was tempted to draw a face on it! lol.....the wire in the brim holds it up nicely and gives great shape and character to the hat.

The whole hat got brushed over with a diluted down black acrylic paint...and hung up to dry.
I made a crow skull using paperclay...this stuff is called cloud clay and is ultra light when dry so as an accessory on the hat it doesn't weigh it down.
....drawn out to the rough size I wanted, then sculpted and allowed to dry.....
....then painted it up with a watered down wash of black acrylic paint...brushed on and excess wiped off quickly with a cloth.
and used some thick twisted jute rope to tie it around the base of the hat.
Another two pieces done!

Part 3 will cover the mask and hood.